

Propagation Is Where Your Production Schedule Is Won or Lost
Most commercial hydroponic projects are planned around channels, tanks and climate control. In practice, the crop calendar is governed by something smaller: how many saleable plugs you can raise, on time, in transplant-ready condition. A propagation room that runs two days late pushes every harvest slot behind it for the rest of the season.
This guide covers the decisions that matter to a commercial operation — in-house propagation versus bought-in plugs, medium and tray selection, crop-specific timing, the transplant sequence into NFT, Dutch bucket and DWC, and the loss points that quietly cost farms 5–15% of their plant count.
First Decision: Raise Plugs In-House or Buy Them In?
| Model | Typical fit | Advantages | Risks |
|---|---|---|---|
| In-house propagation room | Farms above roughly 0.5 ha, or those running continuous weekly planting | Full schedule control, cultivar control, no transport losses, lowest cost per plant at scale | CAPEX for room, racks, lighting and labour; requires real horticultural skill |
| Bought-in plugs | Start-up farms, seasonal peaks, new crop trials | No fixed cost, fast to start, predictable lead time if contracted | Per-plant cost 2–4×, delivery risk, quality variance, limited cultivar choice |
| Hybrid | Most established farms | Base load in-house, peak and trial volumes bought in | Two quality standards to manage at transplant |
A useful rule of thumb: if you plant on a fixed weekly cycle for more than about eight months a year, in-house propagation usually pays back inside the first two seasons. Below that, bought-in plugs keep capital in the growing area instead.
Medium and Tray Selection: Match the Plug to the System
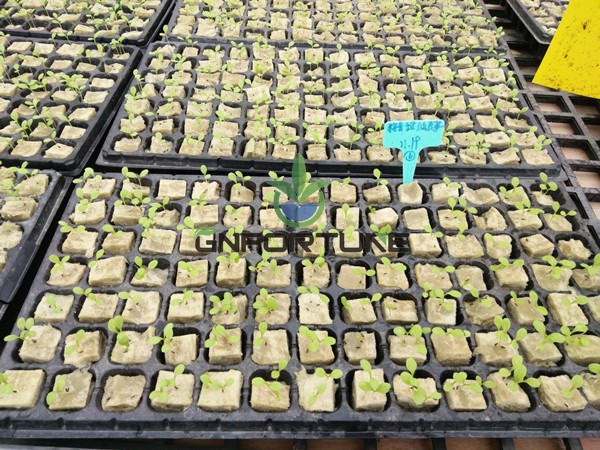
The plug has to survive transplant into a specific receiver — a net pot in an NFT channel, a hole in a Dutch bucket, or a raft board. Mismatch here is a mechanical problem, not a horticultural one.
- Rockwool plugs — the commercial default for NFT and DWC: consistent, clean, holds air and water well. See the detail in our rockwool propagation guide.
- Foam / sponge blocks — low cost, good for lettuce and herbs, dries faster and needs tighter irrigation discipline.
- Coco and peat-based plugs — where organic input is permitted or rockwool disposal is constrained; check batch EC consistency.
- Tray cell count — 128–200 cells for lettuce and herbs; 72–105 for tomato, cucumber and pepper, which need more root volume before transplant.
Cross-check plug diameter against your net pot size before ordering either — the fit is specified in the net pot sizing guide. A plug that sits proud of the pot dries out; one that sinks too deep drowns the crown.
Crop Timing and Plug Specifications
| Crop | Seed to transplant | Tray / medium | Transplant target |
|---|---|---|---|
| Lettuce & leafy greens | 10–14 days | 200-cell, rockwool or foam | 2–3 true leaves, roots at plug edge |
| Culinary herbs (basil, mint) | 21–28 days | 128-cell | Well-rooted, not pot-bound |
| Tomato | 21–28 days | 72–105-cell, rockwool | First flower cluster visible for continuous harvest planning |
| Cucumber | 14–18 days | 77–105-cell | Transplant young — cucumbers resent root disturbance |
| Pepper | 28–35 days | 105-cell | Slowest to establish; schedule buffer required |
| Strawberry | Plug plants, not seed | Tray plugs or bare-root | Crown at media surface, never buried |
Build a rolling calendar backwards from your first harvest date. Add 7–10 days of buffer for the first two cycles — new propagation rooms always run slower than the plan.
The Propagation Environment
Four variables drive plug quality, and they interact:
- Temperature: 20–24 °C for most crops; cucumber and pepper at the warm end.
- Humidity: 85–95% during germination, stepped down to 60–70% as true leaves form. High humidity held too long produces soft, leggy plugs.
- Light: DLI 8–12 mol/m²/day from emergence. Too little stretches the seedling; too much in a high-humidity room invites heat stress.
- Nutrition: EC 0.8–1.2 mS/cm in propagation, stepped to crop EC over the first week after transplant. Reference ranges are in the EC and pH guide.
Air movement is the underrated fifth variable. Gentle horizontal airflow thickens stems and dries leaf surfaces, which is your cheapest defence against damping-off and botrytis before they reach the growing area.
Germination Chamber Practice
For seeded crops, a dedicated germination chamber removes most of the variability:
- 24–26 °C, 95%+ relative humidity, dark or very low light
- Pull trays the moment radicles emerge — typically 2–4 days depending on crop
- An extra day in the chamber is the single most common cause of leggy, untransplantable plugs
- Log emergence percentage per batch; below 90%, investigate seed lot, moisture and temperature before blaming the medium
Hardening: The Three Days That Decide Field Survival
Transplant shock is largely a hardening failure. In the final 3–5 days before transplant:
- Step humidity down in stages toward ambient greenhouse conditions
- Raise light intensity toward the production level
- Reduce irrigation frequency slightly to encourage root growth into the plug, not through it
- Drop propagation EC and begin moving toward crop EC so the root zone does not swing at transplant
Transplanting Into Each System Type
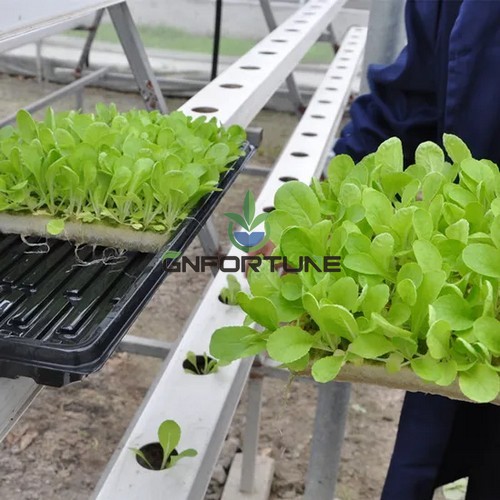
NFT channels
- Seat the plug in a net pot so the base of the plug contacts the nutrient film — not floating above it, not submerged
- Confirm each channel is delivering design flow before transplanting; a dry tail section kills plugs in an afternoon
- Plant at the spacing your crop plan assumes; crowding is the most common self-inflicted yield loss in leafy greens
- Keep lids closed immediately — light at the plug site is algae in a week, which is covered in our algae control guide
Dutch / Bato buckets
- Place the plug so the crown sits above the media surface and the root ball meets moist media, not a dry pocket
- Position the drip emitter on the plug, not 10 cm away; young roots have not reached the bucket volume yet
- Short, frequent irrigations for the first 7–10 days, then step down to the fruiting schedule
- Sizing and emitter layout is set out in the drip design guide
DWC / raft beds
- Set the board so the plug base touches the solution — an air gap dries it, full immersion drowns the crown
- Verify aeration is running before transplanting; root-zone oxygen matters more than EC in the first week
- Watch water temperature: warm solution plus young roots is the classic setup for Pythium
The First Seven Days After Transplant
This is the highest-risk window in the crop cycle. Standard practice:
- Shade or reduce light load for 24–48 hours if transplanting into high-radiation conditions
- Hold humidity higher than production setpoint for the first two days
- Step EC gradually to crop target over 4–7 days
- Walk the rows daily and count failures — replanting at day 2 is cheap; at day 10 it breaks the harvest schedule
- Do not sanitise the system with plugs in it; complete the between-cycle clean before the new batch enters
Labour and Throughput Planning
Propagation is a labour line item that is easy to underestimate:
- Seeding: a bench seeder handles roughly 200–400 trays/hour; a drum or vacuum line 400–800 trays/hour
- Transplanting: expect 300–600 plugs per worker-hour into NFT, lower for large-cell vine crops
- Count back from weekly plant requirement — at 20,000 plants/week and 400/hour, transplanting is a 50-worker-hour job every week, not a morning’s work
- Size the propagation room at 8–12% of growing area for lettuce cycles, higher for vine crops with long plug times
Where the Losses Actually Happen
- Leggy plugs — one extra day in the germination chamber, or insufficient light after emergence
- Pot-bound plugs — transplant scheduled late; roots circle and establishment stalls
- Dry-out at transplant — plugs left on the bench, or emitters not aimed at the plug
- Media too wet — reduces oxygen at the crown and invites damping-off
- Disease carried forward — dirty trays and racks between cycles; treat propagation hygiene as strictly as the growing system
- No buffer stock — with zero spare plugs, a single germination failure becomes an empty harvest slot a month later
Raising 5–10% spare plugs costs a fraction of an empty channel week and gives you the ability to replant failures immediately.
Procurement Checklist
- Weekly plant requirement by crop, and whether it is continuous or seasonal
- Propagation area available, rack configuration and lighting specification
- Medium preference and disposal constraints in your market
- Tray cell count matched to crop and to your net pot or board size
- Seeding equipment: manual, bench seeder or automated line
- Water quality and whether propagation gets its own mixing and dosing point
- Climate capability: heating, humidity control, airflow, supplementary lighting
- Whether bought-in plugs are required for peaks, and the lead time to contract
- Target plant count buffer percentage
FAQ
How long should plugs stay in propagation?
Long enough to hold together at transplant and root quickly — 10–14 days for lettuce, 21–28 for tomato. Longer is not better; a pot-bound plug establishes more slowly than a young one.
Can I transplant directly into NFT without a net pot?
It works with the right plug geometry, but net pots make handling, replanting and spacing changes far easier, and they protect the plug from drying. Most commercial farms standardise on pots for that reason.
What EC should plugs receive?
0.8–1.2 mS/cm in propagation, then step up to the crop target over the first week after transplant. A sudden jump from 1.0 to 2.4 at transplant costs you establishment.
Should propagation have its own nutrient tank?
Above a few hundred trays a week, yes. Separate tanks let you run propagation EC and pH independently and stop a propagation mistake from reaching the production reservoir.
How much spare capacity should the propagation room have?
Plan 10–20% above peak plant demand. It covers germination failures, replants and the trial batches you will inevitably want to run.
Planning a Propagation Room or a Full Crop Schedule?
Send your crop mix, weekly plant requirement and target system through the quote form. We will size the propagation area, specify trays, media and net pots to match your channels, and build the rolling transplant calendar around your harvest slots.